Saturday, October 31, 2015

Creepy Drippy Nails

Happy Halloween!! This mani is part of the Halloween Link Up with the Hobby Polish Blogger group on Facebook. 

For this mani, I painted my nails with a base color of Zoya Belinda. Probably my favorite purple at the moment. It's so mesmerizing! For my ring finger, the base color is Orly Liquid Vinyl. For the drips, I used Orly Liquid Vinyl and Whimsical Nail Polish by Pam in Itsy Bitsy Spider for the drips on my ring finger. See below for a little tutorial.

This mani was difficult to photograph as the colors are quite dark. These pictures, unfortunately, don't do it justice. 


Fridge lighting

Outdoors

And now for a mini tutorial:

Step 1. Paint a base color. Two coats of Zoya Belinda here.


Step 2. Choose your stencil. I used Vinyl Nail Stencils from Pueen (you can find them on Amazon). Let the base dry completely and put your stencil/tape/what have you over top. I like to weaken the stickiness by sticking it to my skin and pulling it off a couple times. Make sure it's pressed down on your nail good and tight.


Step 3. Paint your drip color.


Step 4. Before the drip color dries, pull of the vinyl. Put on a healthy coat of top coat and you're done.


 Spooky.


Thanks for reading! Check out some of the fabulous Halloween nail art from the talented bloggers below.

-Melissa :)

All products used in this post are from my collection and were not provided for review.

Friday, September 25, 2015

Fall Colors - HPB Linkup

Today's post is another linkup with the Hobby Polish Bloggers group on Facebook. This month's theme is fall/autumn.

Ahh, Fall--my favorite season. Cooler temps, fall colors, sweaters, boots, pumpkin everything. Never mind that it's still in the 90s here in Southern California and far too hot for sweaters or boots at the moment. And unfortunately, fall colors don't really happen here so I resorted to putting them on my nails instead. I can pretend it's fall, right?

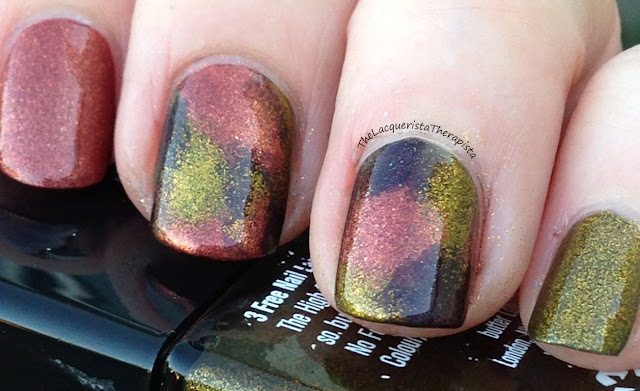
For this mani, I used some of my favorite Butter London Polishes: Shag, Branwen's Feather, and Wallis. Each one has a different metallic shimmer for that festive fall feel. For my middle and ring fingers, I sponged on the polishes with a makeup sponge. Unfortunately, the photos don't do any favors for Branwen's Feather. It is a rich, deep eggplant color, but appears more black in the photos.


Sponged Fall Colors Butter London


Sponged Fall Colors Butter London


Looking forward to many more fall-themed manis. We'll see how many I will manage to post (ha!). Thanks for reading!

Melissa :)


Saturday, July 25, 2015

HPB Presents: Starry Summer Nights

This month's Hobby Polish Bloggers theme is "Starry Night Sky." I chose to create a dusky sky when the stars just start to appear. My goal was to depict a view from a mountain overlooking a distant horizon shortly after the sunset. You know that magical time when the surroundings are silhouettes and the sky is filled with deepening color on a clear summer night? It's my favorite.


Starry Night Sky nail art


I used several polishes for this mani. To create the gradient, I used: Butter London - Royal Navy, Essie - Aruba Blue, Zoya - Blu, and China Glaze - Sun Worshipper.

The grayed-out ground in the distance is Essie - Lapiz of Luxury and the black is Orly Instant Artist - Jet Black.

The "stars" at the top of the gradient and on my index and pinkie fingers are from one of my all time favorite polishes, Model City Polish - Geminids. These photos do not do it justice. I love it so much (for many reasons), but the tiny bar glitter makes it special. Reminds me of shooting stars (as in the Geminids meteor shower).


Starry Night Sky nail art


For this mani, I tried out the liquid latex technique that has been gaining popularity. Since I was doing a gradient, this was the perfect opportunity to try it out. Gradients are messy. I painted liquid latex on the skin around my cuticle. The one I used is called Liquid Latex Fashions in teal. Found it on Amazon.


Latex Technique for Nail art


And then proceeded with the gradient. I used a makeup sponge to make the gradient. See the glorious mess created by the gradient? Blue polish is a pain in the arse to remove from skin, too.


Latex Technique for Nail art


After 3 layers of the gradient, I painted the tree silhouettes with Orly Instant Artist. It's one of those nail art polishes with a tiny, thin brush.


Next, time to peel off the latex! It came off really easily and revealed (mostly) clean skin. Success!


Latex Technique for Nail art


Clean up a bit with some acetone, glaze it over with top coat, and the gradient looks smooth. Since it was nighttime when I did this mani and the lighting in my home isn't the best for photos, I opted for a refrigerator-lit photo. I think the cool-toned LEDs in the fridge capture the richness of the blue polish rather nicely.


Starry Night Sky nail art


This mani makes me want to go stargazing. Living in suburbia, I don't regularly get to see views like this so putting it on my nails is the next best thing!


Starry Night Sky nail art


If you'd like to see more Model City Polish, check out her Etsy shop.

Happy Summer to all! Thanks for reading.

Check out the fabulous Starry Night Sky manis from other Hobby Polish Bloggers below!


-Melissa

All polishes and products used in this post are from my own collection and were not provided for review.