Saturday, October 31, 2015

Spooky, Sparkly Spiderwebs - HPB Linkup

BONUS POST!  Because I love Halloween, I thought I'd post twice in one day. *GASP* (Also, it's another link-up post with the Hobby Polish Bloggers on Facebook...check out more Halloween manis below)

Behold! 'Tis a sparkly and glittery spiderweb mani! I used a black base, Orly Liquid Vinyl, for each nail. The glitter is Ozotic 528 (*drool*). The middle and ring finger polish is Zoya Belinda and Giovanna sponged on with a makeup sponge. I used Vivid Lacquer Pro Collection XL 05 for the stamp with Konad White polish.

Indoor lighting


Outdoors - shade

Direct sun

Gradient Goodness


Have a Happy Halloween!! 

Stay spooky,
Melissa


Don't forget to check out these other fine Halloween manis from other bloggers below.


Creepy Drippy Nails

Happy Halloween!! This mani is part of the Halloween Link Up with the Hobby Polish Blogger group on Facebook. 

For this mani, I painted my nails with a base color of Zoya Belinda. Probably my favorite purple at the moment. It's so mesmerizing! For my ring finger, the base color is Orly Liquid Vinyl. For the drips, I used Orly Liquid Vinyl and Whimsical Nail Polish by Pam in Itsy Bitsy Spider for the drips on my ring finger. See below for a little tutorial.

This mani was difficult to photograph as the colors are quite dark. These pictures, unfortunately, don't do it justice. 


Fridge lighting

Outdoors

And now for a mini tutorial:

Step 1. Paint a base color. Two coats of Zoya Belinda here.


Step 2. Choose your stencil. I used Vinyl Nail Stencils from Pueen (you can find them on Amazon). Let the base dry completely and put your stencil/tape/what have you over top. I like to weaken the stickiness by sticking it to my skin and pulling it off a couple times. Make sure it's pressed down on your nail good and tight.


Step 3. Paint your drip color.


Step 4. Before the drip color dries, pull of the vinyl. Put on a healthy coat of top coat and you're done.


 Spooky.


Thanks for reading! Check out some of the fabulous Halloween nail art from the talented bloggers below.

-Melissa :)

All products used in this post are from my collection and were not provided for review.

Friday, September 25, 2015

Fall Colors - HPB Linkup

Today's post is another linkup with the Hobby Polish Bloggers group on Facebook. This month's theme is fall/autumn.

Ahh, Fall--my favorite season. Cooler temps, fall colors, sweaters, boots, pumpkin everything. Never mind that it's still in the 90s here in Southern California and far too hot for sweaters or boots at the moment. And unfortunately, fall colors don't really happen here so I resorted to putting them on my nails instead. I can pretend it's fall, right?

For this mani, I used some of my favorite Butter London Polishes: Shag, Branwen's Feather, and Wallis. Each one has a different metallic shimmer for that festive fall feel. For my middle and ring fingers, I sponged on the polishes with a makeup sponge. Unfortunately, the photos don't do any favors for Branwen's Feather. It is a rich, deep eggplant color, but appears more black in the photos.


Sponged Fall Colors Butter London


Sponged Fall Colors Butter London


Looking forward to many more fall-themed manis. We'll see how many I will manage to post (ha!). Thanks for reading!

Melissa :)


Saturday, July 25, 2015

HPB Presents: Starry Summer Nights

This month's Hobby Polish Bloggers theme is "Starry Night Sky." I chose to create a dusky sky when the stars just start to appear. My goal was to depict a view from a mountain overlooking a distant horizon shortly after the sunset. You know that magical time when the surroundings are silhouettes and the sky is filled with deepening color on a clear summer night? It's my favorite.


Starry Night Sky nail art


I used several polishes for this mani. To create the gradient, I used: Butter London - Royal Navy, Essie - Aruba Blue, Zoya - Blu, and China Glaze - Sun Worshipper.

The grayed-out ground in the distance is Essie - Lapiz of Luxury and the black is Orly Instant Artist - Jet Black.

The "stars" at the top of the gradient and on my index and pinkie fingers are from one of my all time favorite polishes, Model City Polish - Geminids. These photos do not do it justice. I love it so much (for many reasons), but the tiny bar glitter makes it special. Reminds me of shooting stars (as in the Geminids meteor shower).


Starry Night Sky nail art


For this mani, I tried out the liquid latex technique that has been gaining popularity. Since I was doing a gradient, this was the perfect opportunity to try it out. Gradients are messy. I painted liquid latex on the skin around my cuticle. The one I used is called Liquid Latex Fashions in teal. Found it on Amazon.


Latex Technique for Nail art


And then proceeded with the gradient. I used a makeup sponge to make the gradient. See the glorious mess created by the gradient? Blue polish is a pain in the arse to remove from skin, too.


Latex Technique for Nail art


After 3 layers of the gradient, I painted the tree silhouettes with Orly Instant Artist. It's one of those nail art polishes with a tiny, thin brush.


Next, time to peel off the latex! It came off really easily and revealed (mostly) clean skin. Success!


Latex Technique for Nail art


Clean up a bit with some acetone, glaze it over with top coat, and the gradient looks smooth. Since it was nighttime when I did this mani and the lighting in my home isn't the best for photos, I opted for a refrigerator-lit photo. I think the cool-toned LEDs in the fridge capture the richness of the blue polish rather nicely.


Starry Night Sky nail art


This mani makes me want to go stargazing. Living in suburbia, I don't regularly get to see views like this so putting it on my nails is the next best thing!


Starry Night Sky nail art


If you'd like to see more Model City Polish, check out her Etsy shop.

Happy Summer to all! Thanks for reading.

Check out the fabulous Starry Night Sky manis from other Hobby Polish Bloggers below!


-Melissa

All polishes and products used in this post are from my own collection and were not provided for review. 


Friday, June 19, 2015

Seafoam and Sparkling Sand

I have a beachy mani for this week's post. I've been itchin' to try the "water spotted" technique that's been floating around the internet for a while now. Here's a link to the beach nails tutorial from elleandish that I used for this mani. I basically followed the tutorial and didn't get too creative with it for my first attempt with this technique.

For polish, I did a base layer of white (Zoya - Purity). Then, with a makeup sponge, I dabbed on a gradient using Essie - Sand Tropez, Zoya - Wednesday, and Zoya - Robyn. Next was the "foam" layer. I dabbed a little Essie - Pure Pearlfection over Sand Tropez for some sparkle. My ring finger is Zoya - Godiva for a sparkly, sandy effect. For the "foam," I used Zoya - Purity.


Zoya; beach; ocean; seafoam; sand; blue; green; Essie
Direct sun

To add to the beachy effect, my camera opted to portray my hands in a lobstery shade of red.


Zoya; beach; ocean; seafoam; sand; blue; green; Essie
Indirect sun
To make the foam, fill a cup with room temperature water and drop some white polish in it, waiting for the polish to spread in the water, as if doing a water marble. Then lightly mist a body spray that contains alcohol over the polish until you achieve your desired effect. Little holes form when the spray hits the polish. Then pick your spot and dip your finger in. It helps to tape around your nail or use some liquid latex for easy clean up. Slap on a top coat to smooth everything out and you're done.

It was exciting to see this mani come together. It really reminds me of foamy salt water at the seashore. I can't wait to try some more looks with this water and body spray technique.

Thanks for reading!

- Melissa


Sunday, June 7, 2015

Metallic Floral Stamping

My goodness, how quickly the time passed between now and my previous post! During that time, I acquired a new job, which has limited my time for nail art (alas!). It has also resulted in plain manis that I felt weren't worthy of posting here. I do, however, have one for today. 

I was going for a monochromatic stamped look with this one, choosing a green base, Zoya Josie, and a green foil, Sally Hansen Color Foil- Minted Metal, for stamping. The metallic appears more silvery in this combo so it's not exactly what I had in mind, but I think it looks nice, nonetheless. For the stamp, I used Vivid Lacquer plate, VL033.

stamp; green; vividlacquer; zoya; floral; metallic; sallyhansen
Shiny! Direct sun lighting

I managed to get the stamp on the entire nail, well, except for a bit on my index finger. This, to me, was miraculous. I don't know if it's because my nails are rather curved, or if it's simply a practice thing, but I tend to have difficulty getting the stamp to cover my whole nail. So hooray.

stamp; green; vividlacquer; zoya; floral; metallic; sallyhansen
Direct sun

The lighting really affects how the green polish looks. The indirect sun lighting below is more color accurate.

stamp; green; vividlacquer; zoya; floral; metallic; sallyhansen
Outdoors, indirect sunlight
Metallic polishes are my favorite for stamping. They go on so easily. Pretty much any brand metallic foil polish will work, too.  If you're interested in Vivid Lacquer stamping plates, you can find them on their Etsy page.

Thanks for reading!
-Melissa


All polishes and products used in this post are from my personal collection and were not provided for review. All opinions are my own.


Sunday, February 22, 2015

HPB Presents Valentine's Hearts with Water Marble and Dry Marble

I hope everyone had a lovely Valentine's Day! I totally missed posting anything for Valentine's Day this year! For shame. However, I still wanted to get this out there because it was the first successful water marble I've done in a LONG while. Hooray! I wanted to see if I could make hearts using wet and dry marbling techniques.

Water Marble Hearts
For the marble, I used Zoya Mira and Fingerpaints Art You Kidding Me. I also applied a pale pink base color, Ulta Babydoll, to help the colors pop. White would also work well as a base. The glittery polish is Sally Hansen Gem Crush in Be Jeweled. I didn't make a tutorial for this, but I used this tutorial by James Nash as inspiration. Each nail is finished with Seche Vite top coat.

water marble, heart, zoya, pink, purple, Valentines
Indoor LED lighting

water marble, heart, zoya, pink, purple, Valentines
Outdoors, shade

water marble, heart, zoya, pink, purple, Valentines
Direct sun
The hearts on my thumb were made with dotting tools.


Dry Marble Hearts
I really love dry marbling. It's so much less messy than water marbling and the effects can be really cool. For this, I used the same polishes as for the water marble hearts. To do the dry marble, I painted a base color of either Fingerpaints Art You Kidding Me or Zoya Mira. Before the base color dried, I applied 4 dots down the center of my nail. Using a fine tipped dotting tool and starting near my cuticle, I dragged a line down the middle of the dots to create a heart effect. You could also use a pin or a toothpick instead of a dotting tool. Seal with Seche Vite top coat and that's that.

dry marble, heart, zoya, pink, purple, Valentines
Indoor LED lighting

dry marble, heart, zoya, pink, purple, Valentines
Outdoors, shade

dry marble, heart, zoya, pink, purple, Valentines
Direct sun

So that's it. I think the marbling techniques work well for making hearts. Now that I had a successful water marble, there may be more water marbling in my future...


Thanks for reading!
-Melissa


Check out these other fabulous Valentine's manis from the talented Hobby Polish Blogger folks:


Monday, February 2, 2015

Subtle French: Matte with Shiny Tips - Butter London Lady Muck and Victoriana

There are some polishes that beg to be paired with a matte top coat. Lady Muck and Victoriana from Butter London are two of those polishes. Really, they're beautiful no matter the finish, but the creamy formula with a subtle shimmer just works so well when matte.

Victoriana is one of my favorite Butter polishes. It's a gorgeous color and could be a one-coater if you use a thick coat. I used two thin-ish coats for this mani. It applies smooth as...er...butter (seriously, though). Lady Muck's formula is a bit thinner and required 3 thin coats to look opaque. Victoriana is on my middle and ring fingers, Lady Muck on my index and pinkie. I used Butter London's Matte Finish top coat on all nails.

While I love the matte look, I wanted to play around some more so I added shiny tips with a swipe of Butter London's Hardwear P.D. Quick Top Coat. The tips are so subtle that they were difficult to photograph as you might notice in the first picture. Where are the tips? I promise they're there.

Butter London, Lady Muck, Victoriana, matte, tips, shimmer
Butter London Lady Muck and Victoriana - Outdoors, cloudy

The next photos show off the shiny tips a bit better. The color looks different in each picture, however. The light source is different in each one. There is no color correction or photoshop in any of these photos (except the addition of my watermark).

Butter London, Lady Muck, Victoriana, matte, tips, shimmer
Butter London Lady Muck and Victoriana - Outdoors, indirect sun

Butter London, Lady Muck, Victoriana, matte, tips, shimmer
Butter London Lady Muck and Victoriana - Indoors, fluorescent lighting

Butter London, Lady Muck, Victoriana, matte, tips, shimmer
Butter London Lady Muck and Victoriana - Outdoors, direct sun

What do you think of this subtle French mani? I find that matte top coats don't protect against tip wear quite as well as shiny ones so perhaps the shiny tips will also serve a functional purpose here. Hooray for elegant utility!

Thanks for reading!
- Melissa


All polishes used in this post are from my personal collection and were not provided for review. All opinions are my own.

Monday, January 26, 2015

HPB Presents Butter London - No More Waity, Katie and Zoya - Julie

I'm participating in my first "link-up" blog post. Yay! This month's theme is "New to You." So in honor of the theme, I have a polish color that is new to me: Butter London - No More Waity, Katie. Zoya Julie is the accent nail. It's a simple mani for a time crunched week. The fun thing about simple manis is the challenge of finding coordinating colors in my stash (because I cannot bear to wear only one polish at a time...simple or not!).

No More Waity, Katie is a gray jelly that leans a bit purple with lilac glitter. I haven't seen any other polish quite like it, especially from a mainstream brand. Zoya Julie is a shimmery lilac that goes nicely with the glitter in the Butter polish.

The formula on No More Waity, Katie is a bit sheer, but it is opaque after 3 thin coats. The glitter payoff was satisfactory and didn't require any dabbing. Julie is shown here with 3 thin coats, but you could get away with 2 thick coats.

Outdoors, shade
Outdoors, shade


Direct sun

I love how the glitter looks in the bottle here.
I'm really liking No More Waity, Katie. The name is a bit silly, but the polish is a great professional, yet fun color. I believe this polish came out shortly after Prince William and Kate Middleton became engaged, hence the name. Definitely will be wearing this one again!

Be sure to check out some of the talented bloggers participating in this link-up below!

Thanks for reading!
-Melissa


All polishes in this post are from my own collection and were not provided for review. All opinions are my own.


Sunday, January 11, 2015

Nail Pattern Boldness - Le Big Party and Zoya - Evvie

Today I have a non-nail art mani to share. For this one, I used a polish that I've been aching to use for a while now--Nail Pattern Boldness - Le Big Party. It is tiny, matte rainbow-colored glitter. I used two coats as a topper over two coats of Zoya - Evvie, which Zoya describes as "a dark smoky grey cream with strong teal green undertones." I'd also describe it as a grayed out military green. Base coat is Orly Bonder and top coat, Seche Vite.

Nail Pattern Boldness, Le Big Party, Zoya, Evvie, rainbow, glitter, green
Direct sunlight

Nail Pattern Boldness, Le Big Party, Zoya, Evvie, rainbow, glitter, green
Shade

Le Big Party is so pretty. Look at it! LOOK AT IT!!

Nail Pattern Boldness, Le Big Party, Zoya, Evvie, rainbow, glitter, green
Rainbow glitter! (Close-up in direct sunlight)

I am loving this tiny glitter. Not sure if this is considered "microglitter," but it is very small, nonetheless. Le Big Party would look great over pretty much any color and it is a party on your nails!

In other exciting news, I thought it was time for a little cosmetic makeover on my blog. As an utter noob in the graphic-editing department, I am rather proud of my header design. What do you think? Also, I finally figured out how to do curved text so I'm playing with the curved watermark idea, too. 

Thanks for reading!
- Melissa


All polishes used in this post are from my own collection and were not provided for review. All opinions are my own.


Thursday, January 1, 2015

Happy New Year!

Happy New Year! Boy, 2014 really flew by! Starting a new year always feels like a fresh start, even though it's just an arbitrary time. Last year, one of my goals was to enjoy life a bit more--to live in the moment. I think I accomplished that for the most part. It wasn't perfect, but I'm getting better at it. This year, I am going to work on "trimming the fat." Figuratively speaking, I want to remove unnecessary stress from my life to improve my ability to live in and enjoy the moment. I will also be continuing my pursuit towards a healthy lifestyle. Last year yielded some successes and some challenges on that front. This year will be even better. Lastly, it's time to focus some attention on future goals. More posts, perhaps!

Okay, on to the nails. This is my New Year's mani. Gold, silver, black, and sparkly! I originally intended for this mani to be done with chunky glitter so I started with Nail Pattern Boldness Glitter-A-Peel base coat so that I could remove it easily. Wound up not using chunky glitter, but stayed with the peel-off basecoat since I figured I'd probably change out my mani soon, anyway.

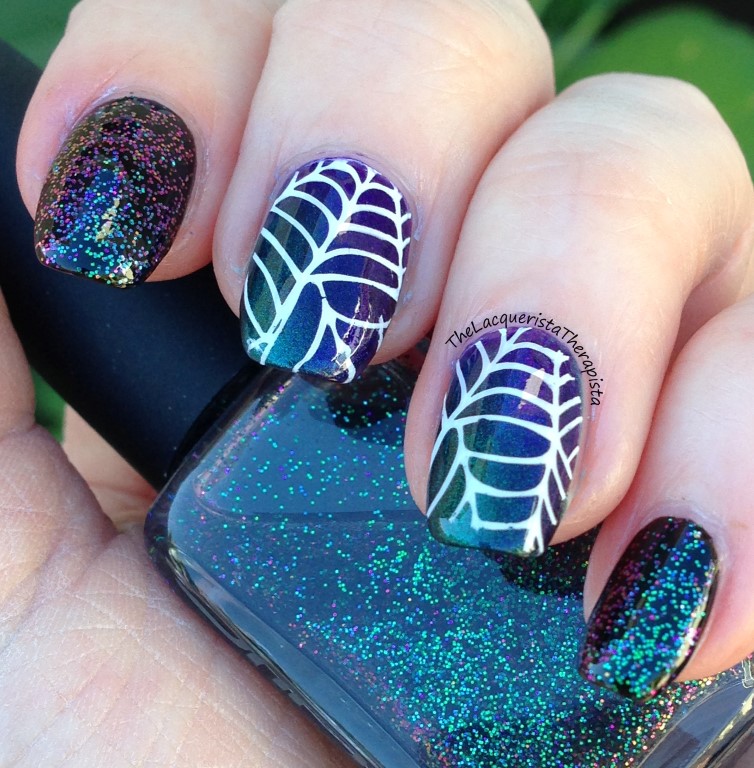
Zoya - Ziv is on the index and pinkie and Zoya - Trixie is on the middle finger. To make it more sparkly, I layered Butter London - Tart with a Heart and China Glaze - Fairy Dust over each. Ring finger is Orly - Liquid Vinyl. For the art deco look, I used a stamp from Vivid Lacquer (VL 031) with Konad stamping polish in black. Each nail has a coat of Seche Vite top coat.

art deco; stamping; nail art; zoya; glitter; gold; silver; black; NYE; New Year
NYE 2014 (shade)

art deco; stamping; nail art; zoya; glitter; gold; silver; black; NYE; New Year
Direct sunlight

My camera struggled to capture the true sparkliness of this mani so I included a blurry photo that gives a slightly better view of the holographic glitter goodness.

art deco; stamping; nail art; zoya; glitter; gold; silver; black; NYE; New Year
Blurry to show the rainbowy sparkliness

Thanks for reading! Here's to a fresh new year full of good times, new experiences, and pretty nails!

Is there something you'd like to see (or see more of) on my blog this year? Comment below to let me know!

Happy New Year!
-Melissa